I recently expanded my homelab with a Mini PC which has a i7-8700T CPU with an integrated GPU. Using a GPU to offload transcoding from the CPU can massively increase the transcoding performance while reducing CPU load. This means a faster Jellyfin Server and more CPU time for other tasks. However, using a GPU in a Virtual Machine (VM) is not always straight forward. Luckily, in Proxmox it is just a few commands away.
Passing the GPU thorugh to the VM
For configuring Proxmox to pass through the integrated GPU to a VM I followed this excellent guide.
However, I encountered some issues as the guide only mentions how to adjust the boot options for the grub bootloader.
As I chose ZFS as the filesystem for my root disk, Proxmox used systemd-boot, which I did not realize at first.
To configure systemd-boot for passing through an Intel iGPU edit the file /etc/kernel/cmdline and append the following.
intel_iommu=on i915.enable_gvt=1 iommu=pt pcie_acs_override=downstream,multifunction video=efifb:off video=vesa:off vfio_iommu_type1.allow_unsafe_interrupts=1 kvm.ignore_msrs=1 modprobe.blacklist=radeon,nouveau,nvidia,nvidiafb,nvidia-gpu
Then, run the command proxmox-boot-tool refresh as root to apply the changes.
Further following the guide, append the following to the file /etc/modules and apply the changes with the command update-initramfs -u -k all.
# Modules required for PCI pass through
vfio
vfio_iommu_type1
vfio_pci
vfio_virqfd

# Modules required for Intel GVT-g Split
kvmgt
After rebooting, we can verify that the changes were successfully by running the command dmesg | grep -e DMAR -e IOMMU and looking for the string DMAR: IOMMU enabled or similar.
If it is present we can continue configuring the VM.
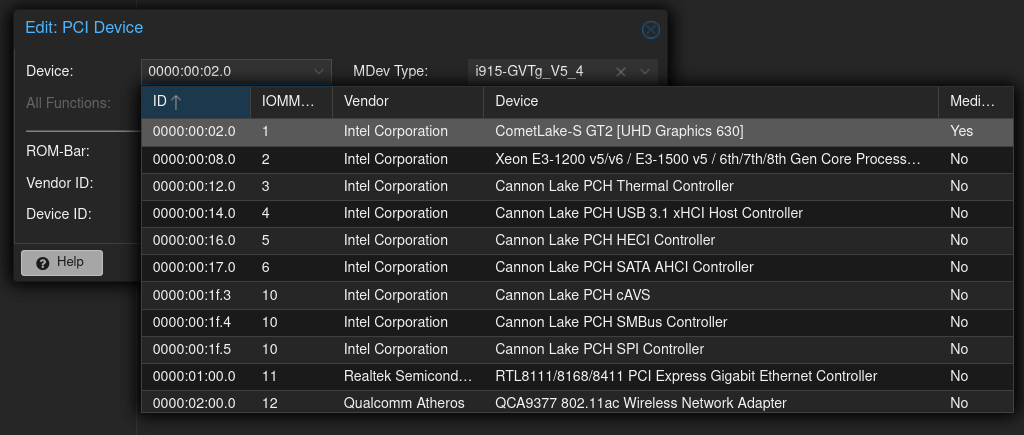
For this go to the hardware tab of the VM, click add and select PCI Device.
Then select the device corresponding to your integrated GPU, e.g. Intel UHD Graphics.
Finally, reboot the VM to apply the changes.
You can see the configuration I use in the screenshot below.
Configuring Jellyfin to Use the GPU
Inside the virtual machine we first check if the graphics card was successfully passed through and recognized, by checking for the presence of a device starting with render in the folder /dev/dri.
If this is present, the pass through was successful.
If it does not show up but is listed in the output of lspci the you might be missing the necessary drivers.
I was able to fix this by installing the package linux-generic using apt.
$ ls -lh /dev/dri
total 0
drwxr-xr-x 2 root root        100 Sep  8 20:10 by-path
crw-rw---- 1 root video  226,   0 Sep  8 20:09 card0
crw-rw---- 1 root video  226,   1 Sep  8 20:10 card1
crw-rw---- 1 root render 226, 128 Sep  8 20:09 renderD128
Then we need to install some packages to successfully use the integrated GPU.
Since the device asociated with the iGPU can only be accessed by the user root or users in the group render we also need to add the user as which Jellyfin runs to this group.
This can be achieved with the commandusermod.
Finally, the Jellyfin service has to be restarted for the changes to take effect.
sudo apt install -y jellyfin-ffmpeg5 intel-opencl-icd intel-gpu-tools
sudo usermod -aG render jellyfin
sudo systemctl restart jellyfin
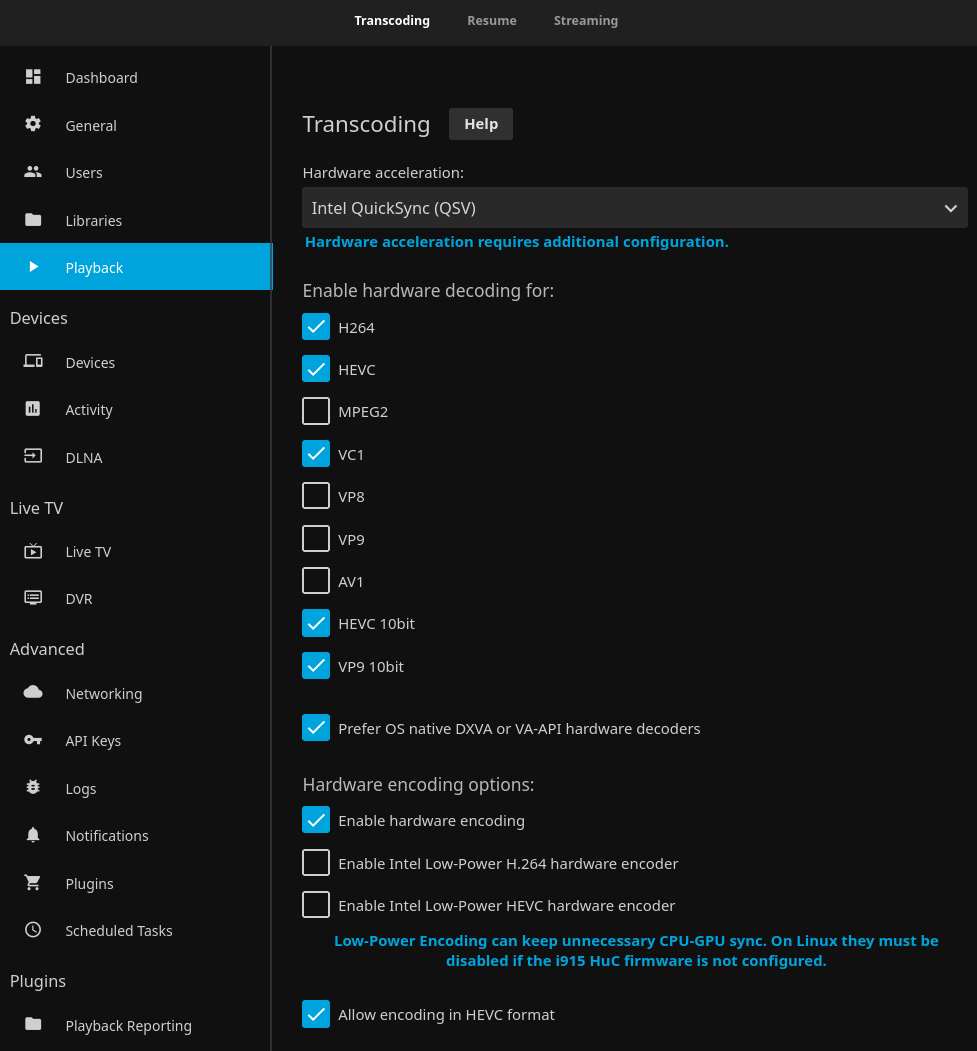
With this done, we still have to enable the hardware acceleration in the Web UI.
This can be achieved in the administration settings under playback.
In the settings, make sure to select Intel QuickSync (QSV) as your hardware acceleration method from the drop-down.
Also select the different codecs you want decoded by your GPU in the list.
For me the most important part was offloading the decoding of HEVC files as those are not directly playable by the Web UI and thus caused very high CPU load.
To truly make your CPU unemployed also enable hardware encoding.
Whereas decoding reads the video file from disk and unpacks it, encoding converts it into a format the can be played by the device on which you’ll be consuming your media. You can find the settings I chose in the screenshot below.
Testing and Conclusion
With that you’re almost done, however make sure to thoroughly test your changes.
Make sure to test different files such as ones using H264 and H265/HEVC encoding and have a high resolution.
If there was an error in the configuration, the media will fail to playback.
To see if your iGPU is utilized you can use the command intel_gpu_top, which we just installed.
Then, just playback some media files from your library and watch your GPU work while you enjoy smooth transcoding.