Goals and Prerequisites
In this post I’ll detail the migration of a Nextcloud instance hosted directly on a server, to an installation using Docker containers. Of course this can also be done to setup a new instance of Nextcloud. Nginx will be used as a webserver and to serve the static content. While PHP-FPM will be used to run Nextcloud’s PHP code. The user data will be stored on an NFS mount. This will be installed on a Ubuntu 20.04 VM which already has Docker and Docker Compose installed.
Backing up the Old Installation
To take a backup of an existing Nextcloud installation three things are needed. First, the data folder where the bulk of the user data is stored, second, the database and last but not least the webroot, which contains the code and configuration of the Nextcloud instance. Since the data directory will be reused, the other two items are backed up to this directory.
Depending on your configuration the following commands might have to be run as root or another user.
In my case the directory containing the user data /data is an NFS mount and therefore the user www-data had to be used to access it.
I used sudo -u www-data -s to switch to this user.
The following command is used to create a dump of the database.
mysqldump --single-transaction -h localhost -u db_user -pdb_pass db_name > /data/dbBackup.sql
The name and password of the user Nextcloud uses to access the database as well as the name and host of the database can be found in the file config.php located in the directory config in the webroot of your current Nextcloud installation.
The webroot is archived using the command tar and the flag -C is used to remove the leading path, in this case /var/www/nextcloud/.
tar -cf /data/webroot.tar -C /var/www/nextcloud/ .
Setting up the New Installation
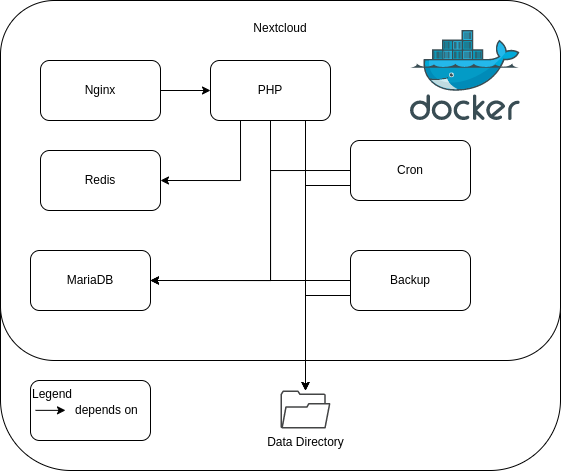
With that out of the way we can turn our attention to the new setup. The following picture shows an overview of the used containers and how they depend on each other.
Requests from users arrive at the Nginx webserver. It either serves static files, like the HTML and JavaScript for the Web GUI directly or forwards the request to the Nextcloud PHP container. This container runs the PHP code of the Nextcloud servers and does most of the work. It uses MariaDB as a database and also uses Redis as a cache, which speeds up the application. Finally, the container Cron runs background jobs and the container Backup periodically backs the Nextcloud config and database up to the data directory, so there everything is in a single place.
Before we dive into the details about each container, some general configuration.
One thing used across multiple containers are secrets, like passwords for our database.
Since these are very secret they should not be stored in environment variables.
Therefore, we’ll store them in files that can be mounted into the containers.
To do this use the following command to create two files nextcloud_mariadb_root_password and nextcloud_db_user_pass which store the passwords for the database.
echo "super secret password" > /nextcloud_local/secrets/filename
Redis Container
The Redis container is the simplest part of the application, it acts as a cache for Nextcloud to optimize performance. Since persistent storage or configuration changes are not necessary, the container image can be used as is.
redis:
  image: "redis:alpine"
  restart: always
  command: redis-server
MariaDB Container
MariaDB is used as the database for the Nextcloud installation and extensive configuration is necessary for this service.
We specify a path on the VM where the database should be stored, by mapping a path to the directory /var/lib/mysqlin the container.
We can also restore the database dump taken in a previous section of this guide, by mounting it into the directory /docker-entrypoint-initdb.d of the container.
For the restore process to succeed we also need to specify a name for the database using the environment variable MYSQL_DATABASE.
Additionally, a name and password for a user who can access the database need to be specified using the environment variables MYSQL_USER and MARIADB_PASSWORD_FILE respectively.
Finally a password for the user root is also specified.
The passwords are passed in as files, which need to be created and mounted into the container.
The resulting snippet from the Docker Compose file:
db:
  image: mariadb:10.5
  restart: always
  command: --transaction-isolation=READ-COMMITTED --binlog-format=ROW
  volumes:
    - /nextcloud_local/db:/var/lib/mysql
    - /nextcloud_local/dbdump/dbBackup.sql:/docker-entrypoint-initdb.d/dbBackup.sql:ro
    - /nextcloud_local/secrets/nextcloud_mariadb_root_password:/run/secrets/nextcloud_mariadb_root_password:ro
    - /nextcloud_local/secrets/nextcloud_db_user_pass:/run/secrets/nextcloud_db_user_pass:ro
  environment:
    - MARIADB_ROOT_PASSWORD_FILE=/run/secrets/nextcloud_mariadb_root_password
    - MARIADB_PASSWORD_FILE=/run/secrets/nextcloud_db_user_pass
    - MYSQL_DATABASE=owncloud
    - MYSQL_USER=owncloud
Nextcloud PHP Container
This container is the heart of the installation.
It runs the PHP code for Nextcloud and is configured mainly through the file config.php which controls many aspects of the Nextcloud server.
When migrating an existing installation, make sure the version of Nextcloud specified in the image tag matches the one you have currently installed exactly.
Otherwise you will have to upgrade your instance.
The webroot of the server, which contains the application code and configuration for Nextcloud is mounted into the container from the host.
Keep in mind that this directory has to be owned by the user www-data.
If you’re migrating an existing installation you should unpack the backup of the webroot you took earlier to this directory.
If you used the command from earlier in this guide, you can extract the archive created with the following command:
sudo -u www-data tar -xf /data/webroot.tar -C /nextcloud_local/webroot/
Additionally if you’re not setting up a new installation, make sure the user data directory is mapped to the same path as before.
This is also specified in the file config.php by the value datadirectory.
In my case this is the directory /data in both the host and the container.
This is the resulting snippet from the Docker Compose file. I also mounted the directory containing the certificates which are recognized as valid into the container. This is because the users and their passwords for Nextcloud are stored on an external LDAP server, which is secured with a selfsigned certificate. For this certificate to be recognized as valid, the corresponding public certificate must be loaded on the Nextcloud server.
app:
  image: nextcloud:23.0.0-fpm
  restart: always
  volumes:
    - /nextcloud_local/webroot:/var/www/html
    - /data:/data
    - /etc/ssl/certs/:/etc/ssl/certs:ro
  depends_on:
    - db
    - redis
Those migrating an existing installation also have to do some modifications to the config file.
First open the file /nextcloud_local/webroot/config/config.php in your favorite editor.
However the file must be owned by the the user www-data, which means you cannot use your normal user or the root user.
Rather you should open vim/nano/emacs like so sudo -u www-data vim /nextcloud....
While editing the file you might want to adjust the array trusted_domains to include the hostname and IP address of the docker host.
Then move on to the key dbhost, which you should change to the value db to match the name of the MariaDB container in the deployment.
If you haven’t done so already, enable Redis caching by setting memcache.locking to \\OC\\Memcache\\Redis.
Then configure redis by setting the value redis to the following
array (
    'host' => 'redis',
    'port' => 6379,
    'timeout' => 5.0,
  )
Nginx Container
Nginx is the webserver, which will be serving the Nextcloud website.
It needs an exposed port to serve the website on and access to the webroot directory.
It’s configuration is done in the file nginx.conf which is mounted into the container an example for which can be found on the Nextcloud GitHub.
Nginx is configured to serve static files such as the HTML and JavaScript for the Web GUI directly and for any interactive things, like showing a users files or calendar, the request is forwarded to the PHP container.
The web traffic is not secured with any certificates, so before actually using Nextcloud be sure to add SSL certificates to the Nginx configuration or put it behind a reverse proxy.
web:
  image: nginx
  restart: always
  ports:
    - 80:80
  links:
    - app
  volumes:
    - /nextcloud_local/nginx/nginx.conf:/etc/nginx/nginx.conf:ro
    - /nextcloud_local/webroot:/var/www/html:ro
Cron Container
To perform background jobs, Nextcloud needs a cron jobs which runs every few minutes. This is handled by an additional container. However I added an additional cronjob to it, which runs the preview generator app. To do this I created a Dockerfile, which adds the job. Make sure you use the same image as for the Nextcloud PHP container earlier.
FROM nextcloud:23.0.0-fpm
RUN echo '0 */2 * * * php -f /var/www/html/occ preview:pre-generate' >> /var/spool/cron/crontabs/www-data
Docker Compose can automatically build this image, but the Dockerfile needs to be placed in a subdirectory called cron of the directory the Docker Compose file is in. To execute the cronjob, access to the webroot and data folder, as well as the database is also needed.
cron:
  build: ./cron
  restart: always
  volumes:
    - /nextcloud_local/webroot:/var/www/html
    - /data:/data
  entrypoint: /cron.sh
  depends_on:
    - db
    - redis
Backup container
While getting Nextcloud to work and setting it up in the way you like might be the most exciting part, taking backups of your data is just as important. For this guide I’m assuming you’re already taking backups of your data directory, but the MariaDB database and the configuration stored in the webroot also need to be backed up. For this we’re going to create a container, which backs them up to the data directory, where they are then included in the regular backups.
This container is based on the MariaDB container, so we have access to mysqldump which will perform the database backups. We install busybox-static to be able to use cron and then add the cronjobs for backing up the database and webroot folders. Please adjust the parameters passed to the command mysqldump if necessary. Since it would be bad to have the database password baked into the container, it is read from a file. Additionally a small script is generated as an entrypoint for the container. You can see the full Dockerfile below.
FROM mariadb:10.5

RUN apt-get update; \
    apt-get install -y --no-install-recommends busybox-static; \
    mkdir -p /var/spool/cron/crontabs; \
    echo '0 4 * * * mysqldump --single-transaction -h db -u owncloud -p$(cat /run/secrets/nextcloud_db_user_pass) owncloud > /data/dbBackup.sql' > /var/spool/cron/crontabs/www-data; \
    echo '30 4 * * * tar -cf /data/webroot.tar -C /var/www/nextcloud/ .' >> /var/spool/cron/crontabs/www-data; \
    \
    echo '#!/bin/sh \nset -eu \nexec busybox crond -f -l 7 -L /dev/stdout' > /cron.sh;\
    chmod +x /cron.sh
The backup container needs access to the webroot and the data directory as well as the file which holds the database password. Of course it also needs access to the database container.
backup:
  build: ./backup
  restart: always
  volumes:
    - /nextcloud_local/webroot:/var/www/html:ro
    - /data:/data
    - /nextcloud_local/secrets/nextcloud_db_user_pass:/run/secrets/nextcloud_db_user_pass:ro
  entrypoint: /cron.sh
  depends_on:
    - db
File Layout
A lot of files have been created, that’s why here’s an overview of them. Please note that it is not complete especially the one in the directories webroot and db.
/nextcloud_local
├── compose
│   ├── backup
│   │   └── Dockerfile
│   ├── cron
│   │   └── Dockerfile
│   └── docker-compose.yml
├── db
│   └── (Database Files)
├── dbdump
│   └── dbBackup.sql
├── nginx
│   └── nginx.conf
├── secrets
│   ├── nextcloud_db_user_pass
│   └── nextcloud_maridb_root_password
└── webroot
    ├── config
    │   └── config.php
    └── (Other Nextcloud Files)
Final Words
In this guide we setup Nextcloud using Docker Compose with Nginx as a webserver. Additionally we even configured some rudimentary backups of our database and configuration, to make sure, none of our data is lost. I hope you found this post informative and learnt something. If you have any suggestions please let me know.